Twitter – key to higher follower numbers?

Twitter LogoThe basic answer is that you have to engage with your audience. Think of Twitter as an extension to your presence in real life.

Talk about things you’re doing, hobbies, jobs, where you are can help by attracting followers from the areas you’re visiting – FourSquare can really help here – check it out!

You should start using ‘#’ tags – this enables your tweets to show up more easily in searches on Twitter. For example, if you’re looking for help fixing your broken Vauxhall motorcar you would add #Vauxhall to your tweet. Anyone then searching for this will see your tweet – and don’t be surprised if you have a Vauxhall dealership or mechanic somewhere reply!

And most importantly do engage – that is the key word. If you have a BlackBerry, iPhone, Android phone there are apps for Twitter available. Otherwise you can access the site at mobile.twitter.com (data charges will apply, so if you don’t want to be charged check with your mobile provider first!)

And post often!

If you would like any further advice and tips just comment below and I’ll be happy to assist!

Implementing Facebook’s ‘Like’ Button to your site

Adding the ‘Like’ button to a web site is fairly simple. Facebook actually have quite a good Developer web site which tells you how to do this.

There are a few steps you need to follow to do this successfully.

  1. Visit the following web site: http://developers.facebook.com/docs/reference/plugins/like/
  2. Scroll down to ‘Step 1 – Get Like Button Code
  3. Add the web address for your site to the ‘URL to Like’ field
  4. Leave the rest as it is and click on ‘Get Code’
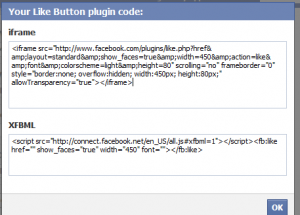
  5. Copy the code from ‘iframe’ and paste it somewhere in the <body> section of your page
  6. Next – scroll down to ‘Step 2 – Get Opn Graph Tags
  7. In ‘Title’ add something like ‘My site’
  8. In ‘URL’ add the address of your site
  9. If you want an image to appear next to the ‘Like’ on Facebook add a web link to it in the ‘Image’ field
  10. In ‘Site name’ add the actual name that you want people to see so ‘Toby White’s web site
  11. Click on ‘Get Tags’ and again copy the code from the ‘iframe’ section to the <head> section of your site – anywhere before </head>

Upload your site and test it out, when you click on ‘Like’ it should pop up and ask you to log in to Facebook if you haven’t already and update saying you ‘Like’ that page. This will update and be reflected on your Profile as well if it’s worked successfully.

To add the button to Tumblr follow the steps above and continue with the following:

  1. Make sure you’re logged into Tumblr
  2. Click on Customize -> Theme -> It should say something like ‘Use custom HTML’
  3. Now that you can see the code you can search using your web browser (Ctrl + F on Windows or Option + F on Mac) to find the specified <head> and </body> tags.
  4. Depending where you want the ‘Like’ button on your layout will depend on what theme you have installed, look for the ‘header’ section in the code

Please leave feedback if you have any questions…

Need a free text editor? – Check out Notepad ++

Okay so it’s only available on Windows but then there are plenty of great editors already available for Linux and Mac so – what’s so great about this one you may ask.

Well – it’s free and what you get for the number of features available is tonnes of power and capability.

I know most dedicated web devs or programmers won’t necessarily be using Windows but for those who do try this out and let me know what you think.

I really do like it!

You can find it here: www.notepad-plus-plus.org

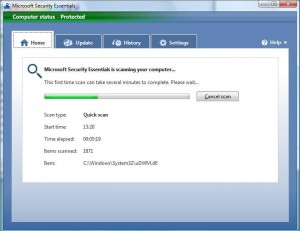
Microsoft Security Essentials – I recommend it over others!

The first advantage of MSE is that it’s 100% free, and I would think most likely always will be… as it’s in Microsoft’s own interest to ensure that it’s client’s and customers are safe and secure whilst using their operating system!

The second advantage of it is that it’s going to be honed to the exact architecture and specific requirements of the OS.

Other things to mention are that it’s integrated directly with Windows/Microsoft update so virus definitions are updated automatically.

Basically the whole piece of software integrates beautifully with the Windows OS (Server versions also available!), it doesn’t slow the computer down unnecessarily and it doesn’t affect usage.

I’ve always said ‘why should you pay for software to protect you from viruses and malware, Microsoft should provide you with this protection’ and now they are finally doing that.

For personal, home and small business users this is perfect!

You can find the download link & more information here: http://www.microsoft.com/security_essentials/

No Drag’n’Drop in Disk Utility when booting from CD

The family Mac Mini has just been upgraded from having a 60GB HDD to a 500GB Drive. I went through the usual spiel of creating a disk image using Carbon Copy Cloner and saving that to an external drive.

We then removed the drive and put the new one in, booted from the original Mac OS X install CD that came with the Mac and attempted to restore the DMG that was on the external drive.

We selected the source (the image we had created) and then did as it said, attempt to drag and drop the destination drive to the field it told us to drag it to. But alas this wouldn’t happen.

After becoming increasingly frustrated I decided to do some power-Googling and it turned out that the 2006 year Mac Mini was supplied with an install DVD that had in fact got a bug – in that there was no way you could drag and drop with the graphical interface.

So this is where the following post came in useful – here!

Luckily you were still able to restore using Temerinal, huzzah! And if that link gets moved here it is for future:

Update: Using the asr function worked perfectly. Remember to first mount your image using Disc Utility on the Install DVD, then quit Disk Utility and go to Terminal (also on the DVD).

Type in “mount” to see the mounted disks and their /dev points.

I had to use the option –erase because without it, it would not copy (not enough disk space), but it may work either way for you. Now knowing that it works 100% perfect (and fairily fast for ~56GB restore image) I would recommend using –erase to erase the target disk before restoring.

asr restore –source [source dev entry] –target [target dev entry] –erase